
The right wall art size makes all the difference between a professionally designed room and one that feels awkward. We’ve all been there—standing in front of a blank wall with a beautiful piece of art, unsure if the size works.
Design principles make selecting wall art sizes straightforward. Your artwork should be 1/2 to 2/3 the width of the furniture below it. To cite an instance, a wall art piece should measure between 47 and 63 inches wide for an 84-inch couch. The standard size recommendations suggest using art that fills 60-75% of the wall width on blank spaces.
This complete guide will show you the right dimensions for your artwork. You’ll learn the proper hanging height (galleries use 58 inches from the ground as standard) and get room-specific suggestions that will help reshape the scene of your walls from empty spaces into perfectly balanced displays of your favorite pieces.
From Photo to Print: Preparing Your Image for Wall Art
Getting your favorite photographs ready for wall art takes more than a simple upload and print. Your digital file’s technical specs will shape how your finished piece looks on your wall.
Choosing the right resolution and aspect ratio
Print clarity and sharpness depend on resolution. Regular screens show images at 72-96 pixels per inch (PPI), but wall art needs much higher numbers. You’ll want at least 300 DPI (dots per inch) for professional prints, though 200 DPI works fine for standard sizes. Larger canvases viewed from far away can work with 150-180 DPI, but up-close viewing needs higher resolution.
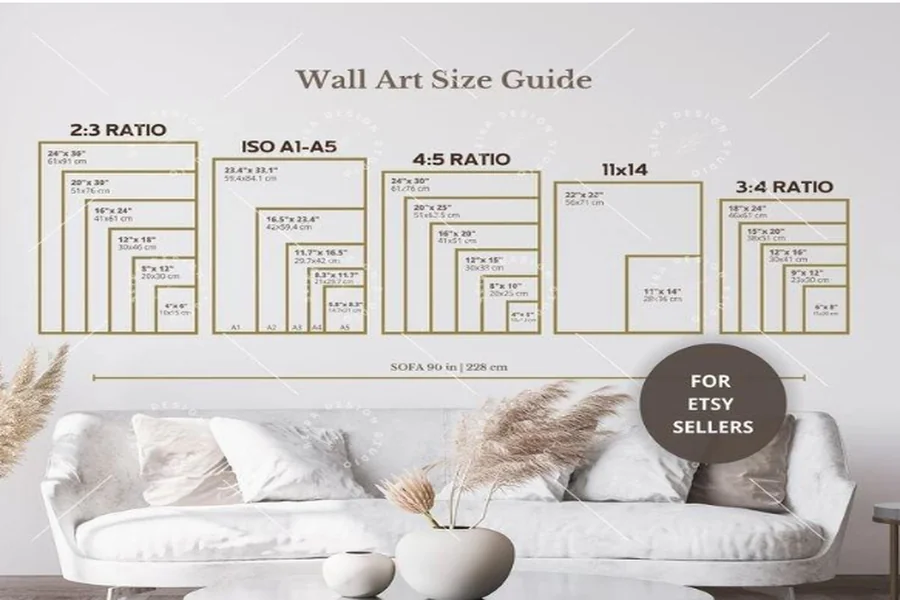
The aspect ratio – how width relates to height – plays a big role in how your art fits your space. Most digital cameras take photos in a 2:3 ratio. Here are other common ratios you’ll see:
- 1:1 (square): Works great for symmetrical compositions and narrow wall sections
- 4:5: A slightly taller rectangle that’s perfect for portrait-oriented images
- 2:1 or 3:1: These panoramic formats look amazing above sofas or in hallways
Cropping and editing tips for print clarity
Your image needs proper preparation before printing. A thoughtful crop can make your composition stronger and remove distracting elements. Just remember that too much cropping can reduce image size and affect print quality.
Prints often look better with slightly more contrast than what you see on screen. Photo editing software’s sharpening tools can boost detail without changing resolution.
Save your final artwork as a high-quality JPEG or PNG file. PNG files keep their quality through multiple saves, while repeated JPEG saves can reduce image quality.
Matching photo orientation to wall space
Your wall space should match your photo’s orientation. Wide spaces above sofas or along hallways call for horizontal or panoramic images. Narrow wall sections between windows work better with vertical formats.
Distance matters too. Bigger prints need more viewing distance. A good rule says your art’s width should be about 60-90% of the viewing distance.
These technical details might seem like a lot, but getting them right turns your precious photos into beautiful wall art that makes your space shine.
Turning Personal Photos Into Finished Artwork
Once your image is properly prepared, there are several ways to bring it to life on your wall. Beyond standard photo prints, many people choose custom-made art from your own photo as a more hands-on and personal option, allowing the final artwork to reflect both the original image and the creative process behind it.
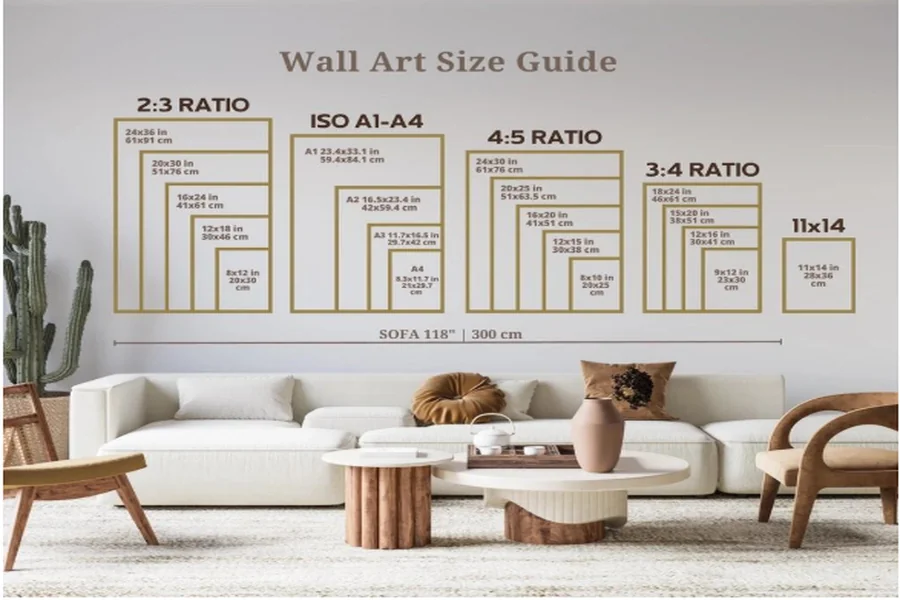
Wall Art Size Guide: Finding the Right Fit
Choosing the right wall art size can be simple. A few basic guidelines will help you pick dimensions that work perfectly in any room.
Standard wall art sizes and what they look like
Wall art typically comes in four size categories:
- Small (8×10″ to 13×19″): Perfect for bathrooms, tight nooks, or gallery walls
- Medium (16×20″ to 20×24″): Ideal for bedrooms, kitchens, and offices
- Large (20×30″ to 24×36″): Great focal points for living rooms and above furniture
- Oversized (30×40″ and up): Statement pieces for spacious areas
Each size creates its own unique impact. Small pieces add subtle touches without taking over, medium pieces work well in most spaces, and large formats become powerful anchors in any room.
How to use the 2/3 and 60–75% rules
Design experts rely on two key principles when picking art dimensions:
The 2/3 rule suggests that your artwork should measure about two-thirds of your furniture’s width. A 90-inch sofa would need art around 60 inches wide. This creates a natural connection between your art and furniture.
The 60-75% rule works for blank walls – your art should take up 60-75% of the available space. Here’s how to calculate the right size:
- Measure your wall’s width in inches
- Multiply by 0.65-0.75 to find target width
- Multiply wall height by 0.65 for ideal height
A 100-inch wide wall would need artwork spanning 60-75 inches.
Understanding how size affects room perception
Your artwork’s scale shapes the entire room’s feel. Smart sizing can:
- Make ceilings look higher with vertical pieces
- Give an illusion of width with horizontal formats
- Create striking focal points with oversized pieces
Research in environmental psychology shows that properly scaled artwork makes spaces feel more comfortable and satisfying. Large pieces can actually make small rooms feel bigger by creating depth that surpasses physical limits.
The right size makes your art look purposeful rather than random or overwhelming in the space.
Applying the Right Size in Different Rooms
Your home’s rooms have their own special dimensions and focal points that just need the right wall art sizes to look their best.
Living room: over sofas and sectionals
Living rooms usually have the most wall space, making them perfect for statement pieces. Your sofa’s artwork should span 60-75% of the sofa’s width. An 84-inch couch looks great with art that’s 47-63 inches wide. A 96-inch sectional works best with pieces 54-72 inches wide. You should hang your art 6-12 inches above furniture. Large sectionals look stunning with either one bold piece or a carefully arranged group that creates a single visual block.
Bedroom: above beds and dressers
Your bedroom’s art should create a peaceful mood while keeping the right proportions. Here are the ideal sizes for headboards: twin beds (22-30 inches), full beds (30-41 inches), queen beds (34-45 inches), and king beds (43-57 inches). Place artwork 6-10 inches above your headboard. Soft abstracts or beautiful nature paintings work best here, as they reinforce a calm, relaxing atmosphere without overwhelming the space. Your dresser’s art should follow the same 2/3 width rule as other furniture.
Dining room and kitchen walls
Horizontal artwork brings balance to dining areas and matches your table’s shape. A 60-inch table looks perfect with art 34-45 inches wide. Your artwork shouldn’t clash with lights or cabinets. Kitchen pieces should stay modest in size and away from cooking zones to protect them from moisture.
Hallways and entryways
Narrow spaces work best with vertical formats that make walls look taller. Your hallways shine with tall portrait orientations or sets of 3-4 vertical pieces. Tight corridors need artwork less than 30 inches wide. The entryway makes a great first impression with a 36×75 inch arrangement. Stacked vertical pieces that lead eyes upward also work beautifully.
Testing and Customizing Your Layout
You can save your walls and avoid regrets by visualizing your artwork before installation. A quick preview of your art in place helps confirm your wall art sizing calculations.
Using painter’s tape and paper cutouts
Physical mockups give you the most accurate picture. You can create a temporary frame by tearing 10-inch strips of painter’s tape and placing them in rows about 6 inches apart. Want an even better preview? Cut paper sheets that match your artwork’s exact size and stick them to the wall. This hands-on method shows you how shadows will fall on your art piece, which is helpful if your piece stands off the wall. Paper cutouts are a great way to try different arrangements for gallery walls or multiple-piece displays.
Digital tools and apps for previewing
The digital world gives you even more ways to see how your art will look. WallApp lets you upload pictures of your room and artwork to see them together at the right scale. Wallary shows your photo on your wall live through your phone camera. Artists and sellers can use ArtPlacer to scale artwork with the right perspective in different room settings. These tools come in various options – from free versions with simple features to paid services ($3.99-59.00 monthly) with advanced capabilities. You can even use Instagram as a quick visualizer by adding your art image to a room photo.
When to break the rules and trust your eye
Technical guidelines matter, but your eye knows best. Interior designers understand that visual appeal sometimes comes from planned imperfection – uneven spacing or asymmetrical layouts can add interest. Listen to your gut, especially with unusual wall spaces or uniquely shaped artwork. Taking photos as you test different layouts helps you see the overall effect and lets you change elements that don’t look right. The best wall art arrangements blend proven sizing rules with what looks good to you.
Conclusion
The right size wall art can turn plain rooms into well-designed spaces. This piece explores how technical prep, proportion rules, and room-specific needs come together to create balanced interiors.
You can start with the 2/3 and 60-75% rules in most spaces, but your personal style will decide what looks best. The shift from digital images to physical prints needs high resolution – shoot for 200-300 DPI to get sharp, clear results.
Wall art comes in many sizes. Your living room can handle bigger statement pieces, while bedrooms look better with medium-sized, peaceful artwork. Narrow spaces and hallways need vertical pieces that pull your eyes up and create good flow.
Testing your layout is crucial before you start hanging. Paper mockups or digital tools are a great way to get a real feel for how your art fits the space. This step helps confirm your size calculations work in real life.
Finding the perfect wall art size mixes both rules and gut feeling. Design principles give you structure, but trust what your eyes tell you looks right. Your artwork should make you happy first – the right size just makes sure it fits perfectly in your home.
Convert Inches to Meters, cm, mm, and Feet
Converted Values:
Meters (m): 1.016
Centimeters (cm): 101.60
Millimeters (mm): 1016.00
Feet (ft): 3.33